


With graduation season here I thought i'd get in some cupcakes for the grads before heading into next weeks series for dads. Although I'll have to say I was at a loss for original graduation topper ideas, lol, so I decided to go with the classics that can be used for high school, college, or even the cute little kindergartener in your life. This week i'm going to show you how to make the graduation cap topper and here's what you'll need to make one:
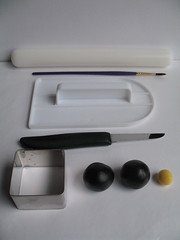
-Rolling pin
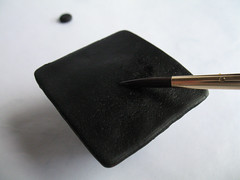
-Paint brush and water
-Fondant smoother
-Knife
-1 3/4" square cookie cutter
-Black (with tylose or gum paste powder added)or whatever color you want the cap to be, and yellow fondant
-1 3/4" square cookie cutter
-Black (with tylose or gum paste powder added)or whatever color you want the cap to be, and yellow fondant
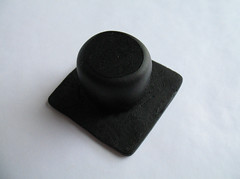
-With the help of the fondant smoother, roll one ball into a tube.

-Turn the tube onto its end and flatten again.
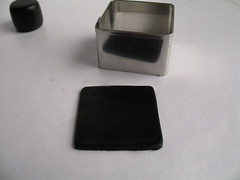
-Take second ball of fondant and roll to an 1/8" and using 1 3/4" cookie cutter cut out top of cap.
(You can also just cut out a square if you don't have this cookie cutter). You will need to let this part air-dry for about 24-48 hours so it will stay stiff on top of the cap!

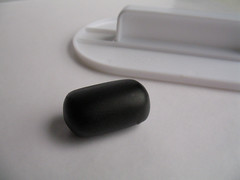
-take a small amount of black and roll out a small ball for button on top of cap.

-Flatten slightly.
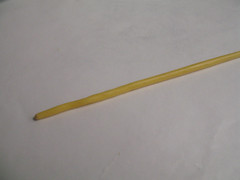
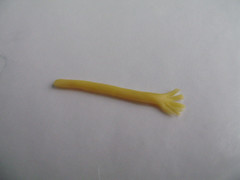
-For tassle, roll out a thin rope of yellow fondant and cut to 1 1/2".
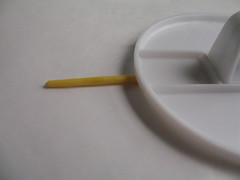
-Flatten 1/4" at the bottom.
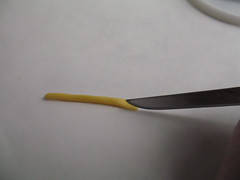
-Using the knife make several slits.
- Once the top part of the hat has dried attatch the bottom with a small amount of water.
-Apply the tassle and then the button to the top.

-Now don't forget to place the tassle on the correct side! It's now time to wish your graduate good luck!!
Happy Tuesday Everyone!!


Beautiful cupcakes for a grad celebration!
ReplyDeleteBlogged!
http://www.ZenCupcake.com
awesome as usual! Thanks you so much for sharing all of this with us
ReplyDeleteGreat stuff! Lovin' your blog! Can't wait to try some stuff out!
ReplyDeleteyou are amazing!!!!
ReplyDeleteFab! Love it!
ReplyDeletewow these are awesome. you re so creative!
ReplyDeleteI just love everything you do!
ReplyDeleteSo cute! Thank you for sharing what you do, and for the great tutorials :)
ReplyDeleteHey Julie Awesome as usual. As stated before I will be having " Trying out the Tuesday Topper" on my blog to link back to yours. Give me a couple days and check back on my blog and you will see how mines came out. I as your student lol. Great work keep it up. You are an inspiration
ReplyDeletewww.bakingmomma.blogspot.com
wow...tq tq tq...my sister will graduate next month...i'll try it
ReplyDeleteIt's so precise and perfect! I love it!
ReplyDeletethanks everyone!! ms cupcake - you rock!! Mara- such a cute idea i'm going to go check it out right now!!
ReplyDeleteThanks so much for your tutorial. Im always looking forward to it. Love your blog.
ReplyDeletecute cute cute!
ReplyDeleteHi, really a good job and a good idea. Thanks for givcing these instructions.
ReplyDeletewww.timecreations.blogspot.com
How can I make a bigger one? my sister in law wants me to make her cake and I need some ideas, she wants a big graduation cap on the top of a 2 layer cake. Help please!
ReplyDeleteThanks so much for the tutorial. Exactly what I was looking for! And so cute! I can't wait to make these for my brothers graduation party.
ReplyDelete